This past weekend we have been making some BIG changes in our kitchen!
We were wanting to spruce up our old out dated counters. After getting an estimate for new laminate countertops with installation for just over $700, we said 'thanks, but no thanks!'.
We decided on trying Rustoleum's Countertop Transformation Kit. The kit we bought was for 30 sq feet, found on ebay for $150 with free shipping.
Our counters were an off white laminate that was chipped and scratched.


Here is the counters before and after...

They were desperately needing some love.
Before we could prep the counters we had to make a cut in the laminate. Our laminate counters were one piece with the backsplash. So we used the oscillating tool and tried to make a straight cut where the counter met the wall.

Then we (my hubby), scraped the backsplash off the drywall. I was holding a fussy baby at the time. Teething is hard stuff for a 4 month old!
Since the backsplash was glued on the wall, it pulled off part of the drywall. Ehh


Before that happened we thought we were just going to cut the costs and paint the wall. Once we realized that would be a lot of mud and sanding we started thinking of other options.
I was researching what to do that would be fast and affordable.
This is the edge we were left with when we cut off the backsplash.... So we knew we needed something thicker to help cover the gap and jagged edge.

I came across this photo when searching for affordable backsplashes and completely fell in love with it! So bright and airy!
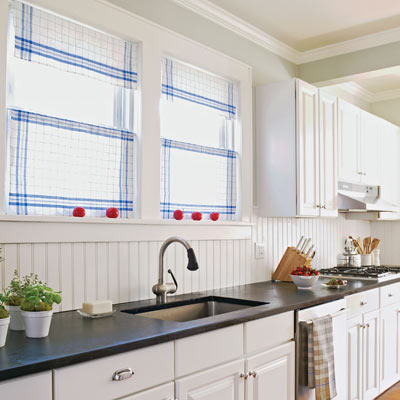
This Old House
I love the contrast between the dark countertops and the white cabinets and backsplash!
And at $20 a 4x8foot sheet, it's a lot more affordable then tile.
So once we figured out what we were doing with the backsplash we were ready for the fun stuff!
We used Rustoleum Countertop Transformation kit.

Prepping the counters didn't take long. We had a few chips on the edges that needed a little filler. Once the filler dried we sanded the counter with the sanding block that came in the kit. Then we lightly sanded over the filled areas too.

Next, we wiped down the counters and let them dry. We made sure to cover the bottom cabinets and floors and tape inside and around the sink and oven.
Scott snapped a picture of me wearing Jude in the Boba carrier while tapping. I LOVE that carrier!

It is very important to carefully tape around the sink. Any tape that is touching the counter will show when the tape is removed.
Another helpful tip, is to score the edge where the tape meets the counter before removing. This prevents the tape from pulling off the fresh paint.

Next was getting the adhesive ready. At this point we had to work fast for the adhesive doesn't dry before the colored chips are on. It worked best to have two sets of hands, one person brushing and the other rolling. The directions said to lay it on thick like frosting a cake.
So frost away we did!


As I mentioned we had to work quickly, so we didn't get many pictures during this part.
Oh, and if you were wondering, I wasn't wearing the baby. He finally decided to nap in the next room! We didn't want any of the kids breathing in any fumes, so we taped a plastic sheet on the doorway to the kitchen. This also helped keep our curious kitty out too!
The kit came with a spray bottle of stuff to help keep the adhesive wet as you worked. We worked fast and have a small space so didn't end up needing it. I could imagine it would be useful if we were covering more square feet.
There wasn't much to sprinkling the color flakes on. We used the dispenser to spread the flakes on and then tossed small handfuls at the edges.... Yep, it made a HUGE mess, but was TONS of fun! haha


The counters are done and I am STILL finding those color flakes everywhere!

That's a lot of extra flakes! We still had 2 whole unopened bags of this stuff too!


Then block off your kitchen from kids and kitties and let it sit for at least 12 hours, no more then 24.
We waited overnight then swept and vacuumed the extra flakes off.

None of the counter painting was difficult, but I would say, the sanding was the hardest part. It was simply time consuming. We (mostly the hubby) sanded and sanded that thing and we finally got it smooth.


Then we vacuumed it and wiped it all down again and waited for it to dry.


We came across some areas where we sanded too much. Thankfully, it was an easy fix. A little more adhesive, color flakes and let sit for a minimum of 4 hours. We just applied the clear coat everywhere but those areas and sanded and sealed them the next day.

You can't even tell we patched it up here! It all blended remarkably well.
The clear coat goes on the same as the adhesive, start at the edges with a brush and roll on the larger areas. We worked in a two person team with this as well.

It immediately darkened the color to more of the black we were going for!


We chose to do this project in the middle of a rain storm turned ice storm, so we had a lot of humidity. It took quite a bit longer then 4 hours for it to even be dry to touch.
We are thrilled with the results!


No comments:
Post a Comment